500 Photo stickers (best stickers for your photos)

500 photo stickers is free app for adding sticker on your photos and create very funny photo. You can save and share with your friends. Over 500 stickers ,many kinds for all people.

************** FEATURES ****************
– You can choose from a gallery or take a photo quickly
– Add multiple stickers to your photo
– Every sticker you can drag to position, rotate and pinch to resize
– Add text to your photos
– 500 stickers , many kind:
* Text
* Cute sticker
* Emoticon
* Face
* Animal face
* Glasses
* Flush
* Funny
* Halloween
* Heart
* Love
* Mouth
* Snap
* Tongue
– Very easy to use, and free.
– Save to gallery, share to friends

Guide for Pokemon Go Privacy Policy

Smartdev team built the  Guide for Pokemon app(binh.app.pokemongoguide) as an Ad Supported app. This SERVICE is provided by Smartdev team at no cost and is intended for use as is.

This page is used to inform visitors regarding my policies with the collection, use, and disclosure of Personal Information if anyone decided to use my Service.

Permission required for app:

we don’t collect sensitive user information, this application just require read and write storage for save photos in app.

This is permission required for app:

<uses-permission android:name=”android.permission.INTERNET” />
<uses-permission android:name=”android.permission.ACCESS_NETWORK_STATE” />
<uses-permission android:name=”android.permission.ACCESS_WIFI_STATE” />

The app does use third party services that may collect information used to identify you.

Link to privacy policy of third party service providers used by the app

Google Play Services
AdMob

I want to inform you that whenever you use my Service, in a case of an error in the app I collect data and information (through third party products) on your phone called Log Data. This Log Data may include information such as your device Internet Protocol (“IP”) address, device name, operating system version, the configuration of the app when utilizing my Service, the time and date of your use of the Service, and other statistics.

Cookies

Cookies are files with a small amount of data that are commonly used as anonymous unique identifiers. These are sent to your browser from the websites that you visit and are stored on your device’s internal memory.

This Service does not use these “cookies” explicitly. However, the app may use third party code and libraries that use “cookies” to collect information and improve their services. You have the option to either accept or refuse these cookies and know when a cookie is being sent to your device. If you choose to refuse our cookies, you may not be able to use some portions of this Service.

Security

I value your trust in providing 100% secure and reliable .

Links to Other Sites

This Service may contain links to other sites. If you click on a third-party link, you will be directed to that site. Note that these external sites are not operated by me. Therefore, I strongly advise you to review the Privacy Policy of these websites. I have no control over and assume no responsibility for the content, privacy policies, or practices of any third-party sites or services.

Children’s Privacy

These Services do not address anyone under the age of 13. I do not knowingly collect personally identifiable information from children under 13. In the case I discover that a child under 13 has provided me with personal information, I immediately delete this from our servers. If you are a parent or guardian and you are aware that your child has provided us with personal information, please contact me so that I will be able to do necessary actions.

Changes to This Privacy Policy

I may update our Privacy Policy from time to time. Thus, you are advised to review this page periodically for any changes. I will notify you of any changes by posting the new Privacy Policy on this page. These changes are effective immediately after they are posted on this page.

Contact Us

If you have any questions or suggestions about my Privacy Policy, do not hesitate to contact me at binhct0407@gmail.com

English Idiom app Privacy policy

Smartdev team built the English Idiom app(app.smartdev.englishidiom) as an Ad Supported app. This SERVICE is provided by Smartdev team at no cost and is intended for use as is.

This page is used to inform visitors regarding my policies with the collection, use, and disclosure of Personal Information if anyone decided to use my Service.

Permission required for app:

we don’t collect sensitive user information, this application just require read and write storage for save photos in app.

This is permission required for app:

<uses-permission android:name=”android.permission.INTERNET” />
<uses-permission android:name=”android.permission.WRITE_EXTERNAL_STORAGE” />
<uses-permission android:name=”android.permission.ACCESS_NETWORK_STATE” />
<uses-permission android:name=”android.permission.ACCESS_WIFI_STATE” />

The app does use third party services that may collect information used to identify you.

Link to privacy policy of third party service providers used by the app

Google Play Services
AdMob

I want to inform you that whenever you use my Service, in a case of an error in the app I collect data and information (through third party products) on your phone called Log Data. This Log Data may include information such as your device Internet Protocol (“IP”) address, device name, operating system version, the configuration of the app when utilizing my Service, the time and date of your use of the Service, and other statistics.

Cookies

Cookies are files with a small amount of data that are commonly used as anonymous unique identifiers. These are sent to your browser from the websites that you visit and are stored on your device’s internal memory.

This Service does not use these “cookies” explicitly. However, the app may use third party code and libraries that use “cookies” to collect information and improve their services. You have the option to either accept or refuse these cookies and know when a cookie is being sent to your device. If you choose to refuse our cookies, you may not be able to use some portions of this Service.

Security

I value your trust in providing 100% secure and reliable .

Links to Other Sites

This Service may contain links to other sites. If you click on a third-party link, you will be directed to that site. Note that these external sites are not operated by me. Therefore, I strongly advise you to review the Privacy Policy of these websites. I have no control over and assume no responsibility for the content, privacy policies, or practices of any third-party sites or services.

Children’s Privacy

These Services do not address anyone under the age of 13. I do not knowingly collect personally identifiable information from children under 13. In the case I discover that a child under 13 has provided me with personal information, I immediately delete this from our servers. If you are a parent or guardian and you are aware that your child has provided us with personal information, please contact me so that I will be able to do necessary actions.

Changes to This Privacy Policy

I may update our Privacy Policy from time to time. Thus, you are advised to review this page periodically for any changes. I will notify you of any changes by posting the new Privacy Policy on this page. These changes are effective immediately after they are posted on this page.

Contact Us

If you have any questions or suggestions about my Privacy Policy, do not hesitate to contact me at binhct0407@gmail.com

My Android Kotlin Tips

Hello guys, as an Android developer, started using Kotlin for Android projects late in 2016 , I’ve got some tips for sharing you today.

  1. Initial Kotlin Tips for Android :

I reconigized several benefits to lazy loading. Lazy loading can result in faster startup time, since loading is deferred to when the variable is accessed. Lazy loading like this is also more memory efficient , as we only load the resource into memory if it is called upon. I give you an example for lazy loading:

val purchasingApi: PurchasingApi by lazy {
    val retrofit: Retrofit = Retrofit.Builder()
            .baseUrl(API_URL)
            .addConverterFactory(MoshiConverterFactory.create())
            .build()
    retrofit.create(PurchasingApi::class.java)
}

By using lazy loading like this, if the user never attempts to check out in the app, you will never load the PurchasingApi, therefore will not use up the resource it would take.

Lazy loading is also a good way to encapsulate initialization logic :

// bounds is created as soon as the first call to bounds is made
val bounds: RectF by lazy { 
    RectF(0f, 0f, width.toFloat(), height.toFloat()) 
}

As soon as the first reference to bounds is made, the RectF is created, using the view’s current width and height , saving us from having to explicitly create this RectF, the set it later on.

2. Custom Getters/Setter

Kotlin’s custom getters and setters use the structure of a model , but specify custom behavior to get and set the fields.

@ParseClassName("Book")
class Book : ParseObject() {

    // getString() and put() are methods that come from ParseObject
    var name: String
        get() = getString("name")
        set(value) = put("name", value)

    var author: String
        get() = getString("author")
        set(value) = put("author", value)
}

Fetching these values would look similar to using property access syntax with other models:

val book = api.getBook()
textAuthor.text = book.author

Now if your model needed to change from Parse to some other data source, your code would potentially only need to be changed in one place.

3. Lambdas

Lambdas reduce the overall lines of code in a souce and allow for funcational programming . While lambdas are currently possible with Android, Kotlin take them a step further byu ensuring you don’t have to deal with RetroLambda or chaning the way your build is configured

For example, an on-click listener would look like:

button.setOnClickListener { view ->
    startDetailActivity()
}

It even works with return values:

toolbar.setOnLongClickListener { 
    showContextMenu()
    true
}

4. Data Classes

Data classes simplify classes, adding equals(), hashcode(), copy(), toString() methods automatically.

data class User(val name: String, val age: Int)

That’s it. Nothing else is needed to make this class work. If you are using data classes with something like Gson or another JSON parsing library , you can create the default constructor with default values like so:

// Example with Gson's @SerializedName annotation
data class User(
    @SerializedName("name") val name: String = "",
    @SerializedName("age") val age: Int = 0
)

 5. Global Constants

Kotlin allows you to define constants that span across an entire app in one place . By using ” const val ”

package com.savvyapps.example

import android.support.annotation.StringDef

// Note that this is not a class, or an object
const val PRESENTATION_MODE_PRESENTING = "presenting"
const val PRESENTATION_MODE_EDITING = "editing"

These can be used as constants anywhere in your project:


import com.savvyapps.example.PRESENTATION_MODE_EDITING

val currentPresentationMode = PRESENTATION_MODE_EDITING


Data Binding Android Kotlin (Part 1)

Một trong những câu lệnh thần thánh bất cứ người học Android nào cũng từng sử dụng rất nhiều

c10fb01d-19ac-446f-838a-189810dc8342


Từ phiên bản Android M thư viện Data Binding giúp chúng ta không cần viết nhiều code để đưa data vào các component trên layout. Việc đơn giản là có các “layout template”, ” data holder” , chỉ cần định nghĩa nguồn dữ liệu, chúng sẽ tự hiển thị theo data tương ứng (Mô hình MVVM)


Cài đặt 


apply plugin: 'kotlin-kapt' ==> level app


kapt 'com.android.databinding:compiler:3.0.1' ==> level app


2. Binding dữ liệu 

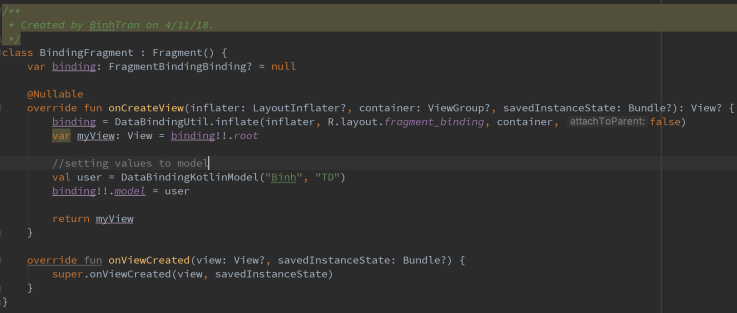
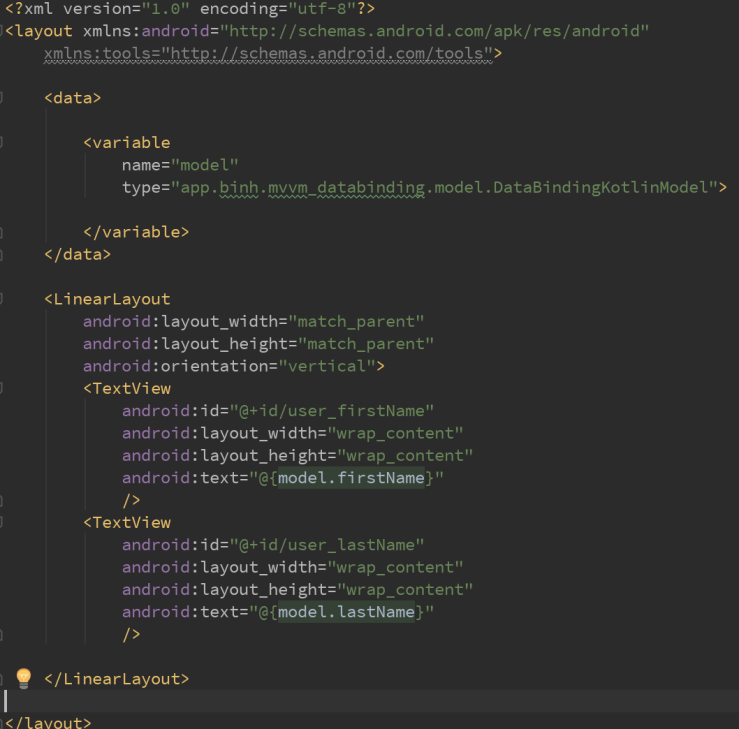
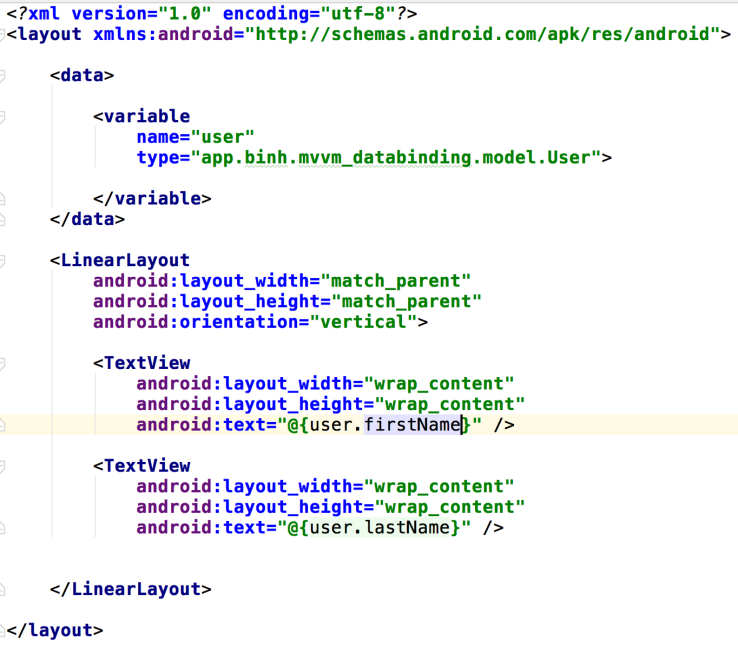
Chúng ta sẽ bắt đầu bằng việc tạo 1 layout trong file xml . Screen Shot 2018-04-10 at 9.49.28 AM

Chúng ta cần 1 Object User để lưu thông tin user. Screen Shot 2018-04-10 at 9.51.48 AM

Tiếp đó trong MainActivity : Screen Shot 2018-04-10 at 9.53.56 AM.png

Khi bạn thêm thẻ <data> <variable </>…….. </data> vào trong file xmll layout thì Android Studio sẽ tự động sinh ra cho bạn class ActivityMainBinding , ta chỉ cần gọi mà không cần khai báo gì .

Phương thức binding.setXXX(object) để set dữ liệu hiển thị lên layout.

XXX tương ứng với tên thuộc tính mà ta khai báo ở thẻ <variable>

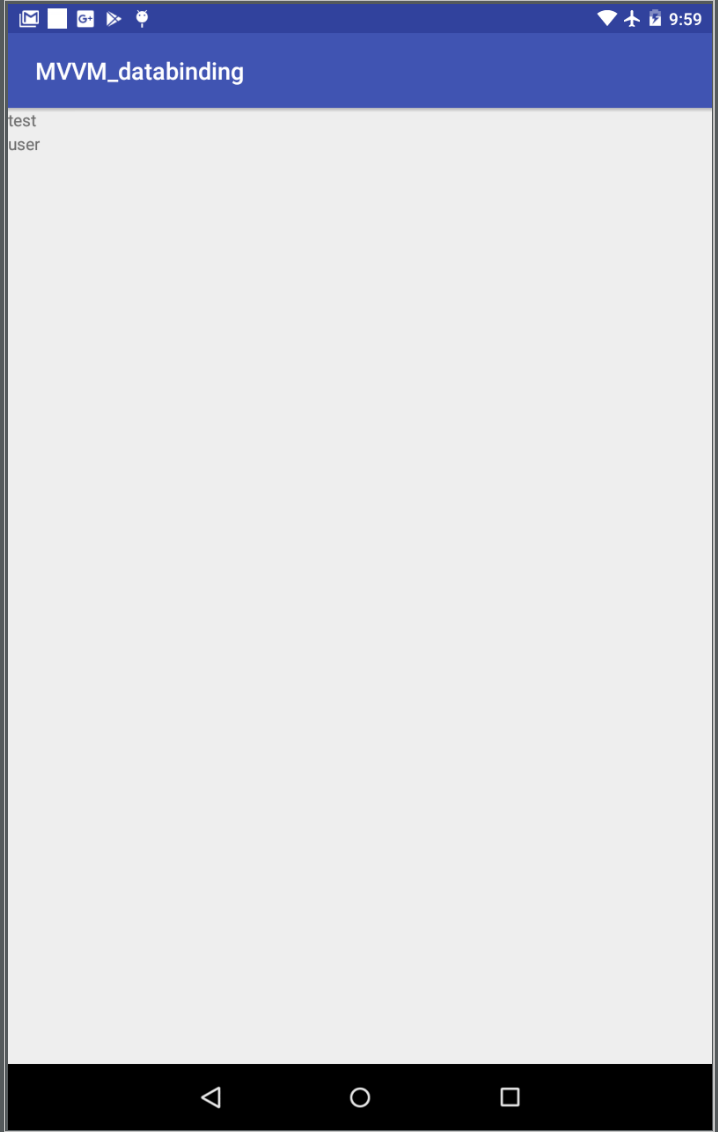
Bây h có thể run project để xem thành quả:

Screen Shot 2018-04-10 at 10.00.54 AM

Đây là cách binding dữ liệu cơ bản nhất, chúng ta binding dữ liệu có sẵn hiển thị lên view. Khi có sự thay đổi dữ liệu chúng ta cần set lại thuộc tính. Trước kia khi chưa có Kotlin  ta cần phải thêm annotation @Bindable, sử dụng biến kiểu ObservableField….

Tuy nhiên hiện nay Kotlin support luôn, khi có thay đổi chỉ cần set lại thuộc tính:

Screen Shot 2018-04-10 at 10.05.25 AM.png

Kết quả như sau:

Screen Shot 2018-04-10 at 10.07.43 AM

Ngoài việc sử dụng để binding text lên View thì bạn có thể dùng BindingData hiển thị bất cứ thứ gì bạn muốn lên View:

 android:textColor="@{user.textColor}"
    android:textSize="@{user.textSize}"
    android:src="@{user.iamge}"

Dùng Dagger 2 DI trong Android

Cài đặt

Integrate thư viện vào project Android

Dagger sẽ tự động generate code khi bạn build project, tuy nhiên, mặc định Android Studio không thừa nhận việc generate ra những đoạn code như vậy, và chúng ta sẽ add thêm plugin sau vào root build.gradle để giai quyết vấn đề đó.

  dependencies {
     // other classpath definitions here
     classpath 'com.neenbedankt.gradle.plugins:android-apt:1.8'
 }

Thêm đoạn script sau vào app/build.gradle

dependencies {
    // apt command comes from the android-apt plugin
    apt 'com.google.dagger:dagger-compiler:2.7'
    compile 'com.google.dagger:dagger:2.7'
    provided 'javax.annotation:jsr250-api:1.0'
}

Dagger đang được hỗ trợ rất tốt nên các version sẽ được cập nhật thường xuyên, do đó các bạn cần chú ý đến version của các dependencies cũng như plugin sẽ được sử dụng.

Implementation

Tư tưởng của Dependency Injection là làm cho các module, class giao tiếp với nhau thông qua một abstract và abstract này sẽ được inject vào high-level class thông qua một Injector, hay nói cách các high-level class sẽ giao tiếp với low-level class thông qua một abstract mà không cần biết nó được khởi tạo như thế nào. Dagger rõ ràng được xây dựng dựa trên tư tưởng đó.

Các thành phần chính của Dagger

  1. Service: hay còn gọi là Module, là nơi cung cấp các abstract để inject vào high-level class.
  2. Client: là nơi sử dụng các Service được inject vào thông qua một Injector.
  3. DI container : thường được biết đến như là Object Graph, nơi cung cấp các Dependency (Service) sẽ được inject vào Client.

Annotation

Dagger sử dụng các annotation để implement nhằm tạo sự đơn gian cũng như tường minh của code.

  • @Scope: annotation định nghĩa vòng đời tồn tại của Object graph, nó thật sự hữu ích trong việc quản lý vòng đời của các Service sẽ được cung cấp cho Client. Chúng ta có thể define các loại Scope khác nhau như một annotation mới và sử dụng trong từng trường hợp cụ thể. Dưới đây là một ví dụ:
@Scope
@Documented
@Retention(value=RetentionPolicy.RUNTIME)
public @interface ActivityScope
{
}
  • @Module: annotation định nghĩa một Module, nơi sẽ cung cấp các service sẽ được inject vào Client.
  • @Provide: annotation được sử dụng trong một Module, định nghĩa các Service sẽ được cung cấp.
  • @Component: annotation định nghĩa một Component, là nơi sẽ expose ra toàn bộ các Service mà bạn dự định sẽ cung cấp cho Client.
  • @Inject: annotation được sử dụng ở Client, thông báo rằng service này sẽ được inject vào Client.
  • @Singleton: annotation sử dụng ở Module, đánh dấu Service được cung cấp dưới dạng một Singleton object.

Implementation

Chúng ta sẽ implement một Module, dùng để cung cấp các service giúp thao tác với API, parse dữ liệu trả về … Ta sẽ hình dung các Service cần cung cấp đến client và các Service cần để làm dependency lẫn nhau.

@Module
public class NetModule {

    private static final String BASE_ENPOINT = "http://dummy.endpoint";

    // Dagger will only look for methods annotated with @Provides
    @Provides
    @Singleton
    // Application reference must come from AppModule.class
    SharedPreferences providesSharedPreferences(Application application) {
        return PreferenceManager.getDefaultSharedPreferences(application);
    }

    @Provides
    @Singleton
    Cache provideOkHttpCache(Application application) {
        int cacheSize = 10 * 1024 * 1024; // 10 MiB
        Cache cache = new Cache(application.getCacheDir(), cacheSize);
        return cache;
    }

   @Provides
   @Singleton
   Gson provideGson() {
       GsonBuilder gsonBuilder = new GsonBuilder();
       gsonBuilder.setFieldNamingPolicy(FieldNamingPolicy.LOWER_CASE_WITH_UNDERSCORES);
       return gsonBuilder.create();
   }

   @Provides
   @Singleton
   OkHttpClient provideOkHttpClient(Cache cache) {
      OkHttpClient client = new OkHttpClient();
      client.setCache(cache);
      return client;
   }

   @Provides
   @Singleton
   Retrofit provideRetrofit(Gson gson, OkHttpClient okHttpClient) {
      Retrofit retrofit = new Retrofit.Builder()
                .addConverterFactory(GsonConverterFactory.create(gson))
                .baseUrl(BASE_ENPOINT)
                .client(okHttpClient)
                .build();
        return retrofit;
    }
}

  • Ở ví dụ trên, ta cần một annotation @Module để khai báo một module mới. Trong module này, ta sẽ sử dụng @Provide để định nghĩa các Service sẽ được cung cấp và @Singleton để đánh dấu rằng các Service này sẽ được khởi tạo một lần. Rõ ràng, chúng ta thấy có những Service được định nghĩa để cung cấp cho Client (ví dụ như Retrofit), cũng có những service được định nghĩa để làm dependency cho các service khác (GsonOkHttpClientCache…)

Chúng ta tiếp tục implement Component, là nơi sẽ expose ra các Service sẽ được client sử dụng.

@Singleton
@Component(modules={NetModule.class})
public interface NetComponent {
   Retrofit retrofit();
   Gson gson();
}

Component NetComponent sẽ expose cho client 2 service là Retrofit và Gson, khi sử dụng ở client, chúng ta sẽ inject nó vào bằng annotation @Inject, sẽ xem xét ở những ví dụ sau.

NetComponent sẽ provide các Service được sử dụng trong toàn app, do đó, scope của nó sẽ và Application hay Graph Object được tạo ra và tồn tại theo vòng đời của Application. Chúng ta tiến hành implement nó trong Application class.

public class MyApp extends Application {

    private NetComponent mNetComponent;

    @Override
    public void onCreate() {
        super.onCreate();

        mNetComponent = DaggerNetComponent.builder()
                // list of modules that are part of this component need to be created here too
                .netModule(new NetModule())
                .build();
    }

    public NetComponent getNetComponent() {
       return mNetComponent;
    }
}

Chúng ta sẽ tiếp tục implement một Component khác, có dependency là NetComponent đã được định nghĩa ở trên. Component này sẽ được sử dụng như một Injector và cung cấp các Service cho client.

@ActivityScope
@Component(dependencies = NetComponent.class, modules= NetModule.class)
public interface AppComponent {
   void inject(MyActivity activity);
}

Annotation @ActivityScope được sử dụng để hạn chế scope của Object Graph, chỉ tồn tại trong vòng đời của một Activity. Ta sẽ tiến hành implement Client.

public class MyActivity extends Activity {
  @Inject Retrofit retrofit;
  @Inject Gson gson;

  @Overide
  public void onCreate(Bundle savedInstance) {
        DaggerAppComponent.builder()
                .netComponent(((MyApp)getApplication()).getNetComponent())
                .build().inject(this);

    }
}

Dagger sẽ tự động tìm kiếm trong Object graph của mình và inject vào Client các Service được đánh dấu bởi @Inject và chúng ta có thể sử dụng chúng mà không cần quan tâm đến cách khởi tạo như thế nào nhé, đó cũng chính là tư tưởng của DI.

Kết luận

Dagger 2 còn cung cấp cho chúng ta rất nhiều tính năng hay ho khác, nhưng trong giới hạn của bài viết, tôi chỉ đề cập đến những tính năng nổi bật nhất mà chúng ta có thể implement ngay trong ứng dụng của mình. Hy vọng rằng các bạn có thể sử dụng Dagger để xây dựng cho mình một ứng dụng “sạch” và “đẹp”. Good luck!!

Dependency Inversion, Inversion of Control and Dependency Injection

Chào mọi người, chắc hẳn trong giới lập trình phần mềm của chúng ta, ai cũng ít nhất một lần nghe đến các khái niệm như SOLID, OOP Design, Dependency Inversion hay IoC … Tuy nhiên không hẳn ai cũng hiểu rõ và thực hành thành công. Theo nhận thức của tôi, rất nhiều kỹ sư phần mềm đã đi làm thực tế được 1-2 năm, thậm chí là 3-4 năm vẫn còn mơ hồ về các khái niệm này và dĩ nhiên ứng dụng nó trong lập trình sẽ cực kỳ khó. Bản thân tôi, trong khả năng của mình cũng chưa dám chắc đã hiểu rõ về tất cả các khái niệm đó. Tuy nhiên, trong giới hạn bài viết này, tôi sẽ chia sẻ một số hiểu biết dựa trên lý thuyết và kinh nghiệm làm việc của bản thân để làm rõ thêm những khái niệm nêu trên mà theo tôi là vô cùng quan trọng và cần thiết đối với một lập trình viên.

Dependency Inversion

  • Dám chắc rằng chúng ta đều biết đến một khái niệm vô cùng quan trọng trong lập trình, đó là OOP Design – Thiết kế hướng đối tượng. Mọi dự án phần mềm làm ra không những đòi hỏi tính đúng đắn về business, về giao diện người dùng, về chức năng … mà còn đòi hỏi sự dễ dàng trong việc mở rộng và maintain. Thiết kế hướng đối tượng ra đời với mục đích đó. Trải qua nhiều dự án phần mềm, người ta đã rút ra được 5 nguyên tắc cơ bản trong Thiết kế hướng đối tượng đó là :
    • Single responsibility principle
    • Open/closed principle
    • Liskov substitution principle
    • Interface segregation principle
    • Dependency inversion principle

    Trong bài viết hôm nay, tôi sẽ làm rõ khái niệm vô cùng quan trọng trong 5 nguyên tắc thiết kế hướng đối tượng, đó là Dependency Inversion.

  • Dependency Inversion phát biểu như sau :
    • Các module, class cấp cao (high-level) không nên phụ thuộc vào module, class cấp thấp hơn (low-level) mà nên phụ thuộc (giao tiếp) với nhau thông qua một abstraction (Interface).
    • Abtraction không nên phụ thuộc vào chi tiết. Chi tiết nên phụ thuộc vào abtraction.

    Khó hiểu quá. Chắc hẳn đọc khái niệm bao giờ cũng vậy, trừu tượng và khó hiểu, đơn giản vì nó chỉ là một nguyên lý, một phát biểu ở mức khái niệm, muốn hiểu rõ hơn tôi sẽ dẫn bạn đến một implementation.

    Giả sử tôi có :

    • Một class Circle (đây là một class low-level) có public cho tôi 2 method : getPerimeter() và getArea() để tính chu vi và diện tích của hình tròn.
    • Một class ShapeManager (đây là một class high-level) sẽ public 2 method : calculatePerimeter() và calculateArea();

    Tôi muốn in ra màn hình diện tích của hình tròn có bán kính cố định nào đó, tôi sẽ implement như sau.

    public class ShapeManager {

        private Circle circle;

        public ShapeManager() {
        }

        public void setCircle(Circle circle){
            this.circle = circle;
        }

        public float calculatePerimeter() {
            return circle.getPerimeter();
        }

        public float calculateArea() {
            return circle.getArea();
        }

    }

Và ở hàm main, tôi sẽ chỉ việc gọi như sau:

public static void main(String[] args) {
		ShapeManager manager = new ShapeManager();
        manager.setCircle(new Circle(5));
		System.out.println("Circle with perimeter and area: "
				+ manager.calculatePerimeter() + ":" + manager.calculateArea());

	}

Code thoạt nhìn không có vấn đề gì cả và vẫn cho ra kết quả đúng. Thế nhưng, nếu tôi muốn mở rộng class ShapeManager có thể tính được nhiều hình khác nhau : hình vuông, hình chữ nhật, hình thoi … thì tôi phải tạo thêm nhiều đối tượng trong class ShapeManager. Càng lúc, class này sẽ phình to ra tới mức tôi không thể hình dung ra được. Rõ ràng, chúng ta đang thấy class high-level ở đây là ShapeManager đang phụ thuộc vào class low-level. Dependency Inversion muốn các module này không nên phụ thuộc vào nhau và giao tiếp với nhau thông qua một abstraction (Interface). Bởi lẽ đó, Inversion of Control ra đời để làm nhiệm vụ đó.

Inversion of Control (IoC)

  • IoC là một design pattern để hiện thực hóa hay implement nguyên lý thiết kế Dependency Inversion nêu trên. Dĩ nhiên, nó sẽ tuân thủ đầy đủ những nguyên tắc là Dependency Inversion phát biểu. Ngay cả cái tên của nó cũng gợi cho ta đôi chút về ý nghĩa của pattern này – sự đảo ngược điều khiển mà với Dependency Injection, bạn sẽ hiểu rõ hơn về khái niệm này.
  • IoC sẽ không quan tâm đến việc Service được khởi tạo như thế nào mà chỉ quan tâm đến những gì mà nó cung cấp thông qua một abstraction. Điều này tuân thủ chặt chẽ nguyên lý của Dependency Inversion nêu trên, tức là các module high-level chỉ phụ thuộc hay giao tiếp với các module low-level thông qua một abstraction, và chính module high-level sẽ không cần biết module low-level sẽ được khởi tạo như thế nào mà chỉ cần biết những gì nó cung cấp. Phần này sẽ được nói chi tiết hơn ở Dependency Injection ở phần sau.
  • IoC sẽ có 1 Container để chứa các concretion implementation của các abstraction dùng để kết nối các module với nhau trong một object graph. Khó hiểu quá nhỉ? Hiểu nôm na nó giống như nơi lưu trữ các implementation của các abtraction mà bạn muốn truyền vào high-level module. Khi nào high-level module cần dùng, nó chỉ việc tìm trong Container với instance tương ứng và inject vào high-level module. Bởi vậy mà high-level module không thể biết Service(low-level module) mình dùng được tạo nên ở đâu là vậy đó.
  • Có nhiều cách để implement IoC như : Service LocatorEvent hay Dependency Injection … và mỗi loại đều có một ưu nhược điểm riêng mà tùy trường hợp sẽ được sử dụng cho phù hợp.

    Trở lại với ví dụ ở đầu bài, trong trường hợp muốn mở rộng class ShapeManager, tôi muốn hỗ trợ thêm các hình khác như hình vuông, hình chữ nhật, tôi sẽ tiến hành implement nó theo IoC.

  • Tạo một interface Shape. Interface này sẽ làm nhiệm vụ kết nối ShapeManager (high-level module) với các implementation của Shape (low-level module) hay nói cách khác ShapeManager chỉ phụ thuộc vào interface Shape mà ko cần quan tâm nó được khởi tạo ở đâu và bằng cách nào.
    public interface Shape {

        float getPerimeter();

        float getArea();

    }
  • Tạo các implementation của Shape. Đây chính là các Service(low-level module) cần dùng trong high-level module.
    public class Circle implements Shape {

        private static final float PI = 3.1415f;
        private int radius;

        public Circle(int radius) {
            this.radius = radius;
        }

        @Override
        public float getPerimeter() {
            return radius * 2 * PI;
        }

        @Override
        public float getArea() {
            return (float) (Math.pow(radius, 2) * PI);
        }

    }
    public class Square implements Shape {

        private int size;

        public Square(int size) {
            this.size = size;
        }

        @Override
        public float getPerimeter() {
            return size * 4;
        }

        @Override
        public float getArea() {
            return (float) Math.pow(size, 2);
        }

    }
  • Modify class ShapeManager.
    public class ShapeManager {

         private Shape shape;

         public void setShape(Shape shape) {
             this.shape = shape;
         }

         public float calculatePerimeter() {
             return this.shape.getPerimeter();
         }

         public float calculateArea() {
             return this.shape.getArea();
         }

    }
  • Thử gọi nó nào.
    public static void main(String[] args) {
            Shape circle = new Circle(5);
            Shape square = new Square(5);
            Shape rectangle = new Rectangle(4, 6);

            ShapeManager manager = new ShapeManager();
            manager.setShape(circle);
            System.out.println("Circle with perimeter and area: "
                    + manager.calculatePerimeter() + ":"
                    + manager.calculateArea());

            manager.setShape(square);
            System.out.println("Square with perimeter and area: "
                    + manager.calculatePerimeter() + ":"
                    + manager.calculateArea());

            manager.setShape(rectangle);
            System.out.println("Rectangle with perimeter and area: "
                    + manager.calculatePerimeter() + ":"
                    + manager.calculateArea());

        }
  • Rõ ràng từ ví dụ trên, ta thấy rõ : Nếu trường hợp cần mở rộng thêm các hình khác, ta chỉ cần tạo thêm class implement Shape mà không cần modify ShapeManager().
  • Nếu việc sử dụng các low-level module (trong ví dụ trên là các module Circle, Square …) diễn ra ở nhiều nơi thì việc phải khởi tạo nó sẽ mất rất nhiều thời gian và khó khăn cho việc maintain sau này, giải pháp được sử dụng ở đây là IoC Container.

Dependency Injection (DI)

  • Dependency Injection là một trong những pattern để implement Dependency Inversion, nó là một trong những subtype của IoC.
  • Nguyên tắc cơ bản của DI là làm cho high-level module phụ thuộc vào low-level module thông qua injector, hay nói cách khác, muốn tạo instance high-level module, ta phải tạo instance của low-level module và inject nó vào high-level module thông qua injector. Injector ở đây có thể là constructor, setter hay interface.
  • Nguyên tắc trên có vẻ mâu thuẫn vơi DIP (Dependency Inversion Principle), tuy nhiên nếu xem xét kỹ thì không hòan toàn vậy. Nguyên tắc của DI khác ở chỗ nó sẽ tạo ra sự phụ thuộc của high-level module và low-level module thông qua abstraction chứ ko phải một cách trực tiếp. Như vậy, high-level module sẽ sử dụng Service (low-level module abstraction) thông qua injector mà không quan tâm đến việc khởi tạo của nó. Thật khó hiểu, chính bản thân mình sau rất nhiều lần research vẫn còn chút mơ hồ về vấn đề này. Hãy đến với ví dụ sau.
    public class ShapeManager {

         private Shape shape;

         public ShapeManager(){
             this.shape = new Circle();
         }

         public float calculatePerimeter() {
             return this.shape.getPerimeter();
         }

         public float calculateArea() {
             return this.shape.getArea();
         }

    }
  • Rõ ràng ở ví dụ trên, biến shape là bất biến vì được khởi tạo ngay trong constructor. Điều này là không sai nhưng rất khó để mở rông. Module ShapeManager không phụ thuộc vào bất kỳ Service nào và việc tạo instance của nó cũng độc lập với các Service (low-level abstraction) khác, điều đó đi ngược lại với nguyên tắc của DI. Trong trường hợp này, ta sẽ inject Service vào high-level module thông qua injector.
    • Modify hàm dựng.
        public ShapeManager(Shape shape){
             this.shape = shape;
        }
+ Sử dụng setter
        public void setShape(Shape shape){
             this.shape = shape;
        }
+ Sử dụng interface.
        public interface ShapeSetter{
             void setShape(Shape shape);
        }
        public class ShapeManager implement ShapeSetter {
             private Shape shape;

             @Override
             public void setShape(Shape shape){
                 this.shape = shape;
             }

             public float calculatePerimeter() {
                 return this.shape.getPerimeter();
             }

             public float calculateArea() {
                 return this.shape.getArea();
             }
        }
  • Để inject Service vào high-level module, ta có thể inject manual hoặc dùng DI Container, các framework hỗ trợ rất tốt việc này.
  • DI được sử dụng trong hầu hết các ngôn ngữ hướng đối tượng và có rất nhiều framework hỗ trợ cho việc implement DI. Có thể kể đến Ninject trong C#, Spring trong Java, Dagger trong Android, Laravel trong PHP …
  • DI cũng như hầu hết các pattern khác đều có ưu nhược điểm riêng biệt, tùy từng trường hợp mà ta sẽ xác định dùng nó một cách phù hợp.
    • Ưu điểm : Giảm sự kết dính giữa các module với nhau, code trở nên đẹp và dễ dàng trong bảo trì, dễ dàng viết Unit Test …
    • Nhược điểm: Khó debug, có thể giảm performance vì sẽ tạo các instance ngay ở runtime (DI Container) …

Kết luận

Dependency InversionInversion of Control và Dependency Injection là các khái niệm mà mọi lập trình viên cần biết và sử dụng thuần thục. Trong khuôn khổ bài viết này, tôi chỉ chia sẻ những kiến thức và kinh nghiệm bản thân trong quá trình làm việc, có thể không tránh được những thiếu sót. Vì thế rất mong nhận được mọi góp ý từ các bạn

Push Notification Và Analytic Với Growthbeat

Khi làm việc với các khách hàng Nhật, Các bạn sẽ thường được yêu cầu là tích hợp thêm những SDK nhằm mục tích thống kê (Analytic) hay những SDK có chức năng gửi Push notification. Nói về gủi Push notification các bạn sẽ thường liên tưởng đến Google Cloud Message của Google. Còn chức năng Analytic thì các bạn sẽ nghĩ đến ngay việc dùng Google Analytic( như trong bài viết trước tôi Tích Hợp Google Analytics V4 Trong Ứng Dụng Android )

Nhưng hôm nay tôi sẽ giới thiệu với các bạn một SDK dùng cho cả 2 chức năng gửi Push Notification và Analytic. Đó là Growthbeat

Bước đầu tiền mà các bạn cần làm là đăng ký một tài khoản tại đây.

Khi bạn đã có 1 tài khoản và login với tài khoản đó bạn sẽ vào màn hình như này. Bạn click vào phần setting như hình bên dưới:

Screen Shot 2016-09-26 at 08.45.20.png

Khi bạn đã vào màn hình setting bạn sẽ thấy tại màn hình sẽ có những thông tin như user name, accoun id, ngày tạo tài khoản, email đang ký…
Có một thông tin đặc biết quan trọng mà các bạn càn chú ý đó là Credential ID đó là API KEY VÀ SDK KEY.Bạn sẽ cần phải lưu lại các KEY này trong App của bạn như hình bên dưới:

Screen Shot 2016-09-26 at 08.53.11.png

Tiếp theo chúng ta sẽ tạo một ứng dụng, ở đây bạn tuỳ ý đặt tên ứng dụng bạn muốn với các bước như bên dưới:

  • List những App bạn đã tạo
  • Tạo mới 1 App
  • Mỗi App khi bạn tạo sẽ có một ID, gọi là applicationId, giá trị này các bạn cần phải được lựu lại trong App để sử dụng cho mục đích cấu hình.

Screen Shot 2016-09-26 at 09.06.39.png

Việc tiếp theo các bạn cần phải làm tích hợp SDK growthbeat vào trong Project của bạn. Trước tiên các bạn cần phải download Growtbea SDK về mấy của bạn. Hiện tại ở đây tôi đang dùng version 2.0.2.
Sau khi download sdk các bạn giải nén ra. Sau khi giải nén các bạn đi vào trong thư mục vừa giải nén các bạn sẽ thấy có 3 thư mục tên lần luợt là releasegrowthbeatsample. ở đây có có 2 cách để bạn tích hợp Growthbeat SDK vào trong App của bạn:

  • Tích hợp kiểu add module (Các bạn sử dụng thư mục growthbeat)
  • Tích hợp theo kiểu add thư việc đã được đóng gói thành file .jar(các bạn sử dụng thư mụ release)
    Thư mục sample là thư mực có chứa 1 ví dụ sample, các bạn có thể tham khảo. Tôi khuyên các bạn lên tham khảo.

Sau khi các bạn đã tích hợp được SDK vào trong project của mình. Bước tiếp theo chúng ta cần làm config trong app của chúng.

Trong file AndroidManifest.xml

<!-- [START Growthbeat Push] -->
  <uses-permission android:name="android.permission.VIBRATE"/>
  <uses-permission android:name="android.permission.WAKE_LOCK"/>
  <uses-permission android:name="com.google.android.c2dm.permission.RECEIVE"/>

  <permission
      android:name="jp.mynavi.baito.mynavishortapp.permission.C2D_MESSAGE"
      android:protectionLevel="signature"
      />
  <uses-permission android:name="jp.mynavi.baito.mynavishortapp.permission.C2D_MESSAGE"/>
  <!-- [END Growthbeat Push] -->

   <!-- [START Growthbeat Push] -->
    <meta-data
        android:name="com.google.android.gms.version"
        android:value="@integer/google_play_services_version"
        />
    <meta-data
        android:name="com.growthpush.notification.icon"
        android:resource="@drawable/ic_notification"
        />
    <meta-data
        android:name="com.growthpush.notification.icon.background.color"
        android:resource="@android:color/white"
        />
    <meta-data
        android:name="com.growthpush.dialog.icon"
        android:resource="@drawable/ic_notification"
        />

    <activity
        android:name="com.growthpush.view.AlertActivity"
        android:configChanges="orientation|keyboardHidden"
        android:launchMode="singleInstance"
        android:theme="@android:style/Theme.Translucent"
        />

    <service
        android:name="com.growthpush.TokenRefreshService"
        android:exported="false"
        >
      <intent-filter>
        <action android:name="com.google.android.gms.iid.InstanceID"/>
      </intent-filter>
    </service>
    <service android:name="com.growthpush.RegistrationIntentService"/>
    <service
        android:name="com.growthpush.ReceiverService"
        android:exported="false"
        >
      <ntent-filter>
        <action android:name="com.google.android.c2dm.intent.RECEIVE"/>
      </intent-filter>
    </service>

    <receiver
        android:name="com.google.android.gms.gcm.GcmReceiver"
        android:exported="true"
        android:permission="com.google.android.c2dm.permission.SEND"
        >
      <intent-filter>
        <action android:name="com.google.android.c2dm.intent.RECEIVE"/>
        <category android:name="jp.mynavi.baito.mynavishortapp"/>
      </intent-filter>
      <intent-filter>
        <action android:name="com.google.android.c2dm.intent.REGISTRATION"/>
        <category android:name="jp.mynavi.baito.mynavishortapp"/>
      </intent-filter>
    </receiver>
    <!-- [END Growthbeat Push] -->

Tiếp theo chúng ta sẽ cấu hình trong code
Tại MainActivity.java

GrowthPush.getInstance().initialize(this, "APLICATION_ID", "CREDENTAIL_ID",
            BuildConfig.DEBUG ? Environment.development : Environment.production);
        GrowthPush.getInstance().requestRegistrationId("SENDER_ID");
  • APPLICATION_ID: ID của APP khi bạn tạo
  • CREDENTAIL_ID : là SDK KEY mà tôi đã lưu ý ở trên.

Để có được SENDER_ID các bạn cần phải là register với Google Clouase Messaging.

gcm_create_project.png

  • Sau khi bạn tạo project, bạn sẽ nhìn thấy project id trên url. Đó chính là SENDER_ID bạn đang cần.

gcm_sender_id.png

  • Sau đón bạn click vào Services và turn on Google Cloud Messaging for Android

gcm_enable_service.png

Để ứng dụng của bạn có thể nhận push notification việc cuối cùng các bạn cần là cấu hình Android Push Certificatenhư hình bên dưới:

Screen Shot 2016-09-26 at 10.08.40.png

Android Push Certificate ở đây chính là **Android Key **
khi bạn tạo APP và chọn plfatfrom là Android Google APIs Console

Screen Shot 2016-09-26 at 10.01.06.png

Bây giờ là lúc bạn chạy ứng dụng của bạn và tự tạo 1 notification của riên bạn và gửi về app của bạn như bên dưới:

Screen Shot 2016-09-26 at 10.21.36.png

Ở đây bạn ngoài text, bạn cũng có thể tạo ra 1 định dạnh JSON trong đó chứa những thông tin mà app của xử lý khi nhận notification.

Ngoài gửi notification, Gowthbeat SDK còn tích hợp nhiều chức năng khác, trong đó có chức năng thống kê(Analytic) mà tôi đã nhắc tới lúc đầu.

 GrowthPush.getInstance().trackEvent("Event_Name");
 GrowthPush.getInstance().setTag("Tag_Name, "Tag_Value");

Đặc biết ở đây bạn sẽ nhận được kết quả thống kê real time

Screen Shot 2016-09-26 at 10.43.43.png